Vision2 user roles and steps to set up a new admin portal user
Access to information in Vision2 is controlled by user roles. This article will walk you through creating new admin portal user accounts. The list of available user roles is further down in this article.
Please follow these steps to send a new admin portal user invitation:
-
Click the Administration tab
-
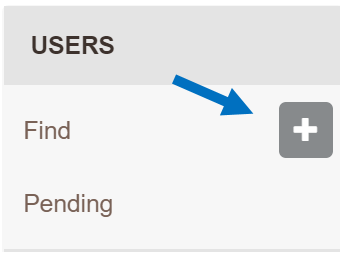
On the left-hand menu, under the Users section, click the Plus Sign (+)

-
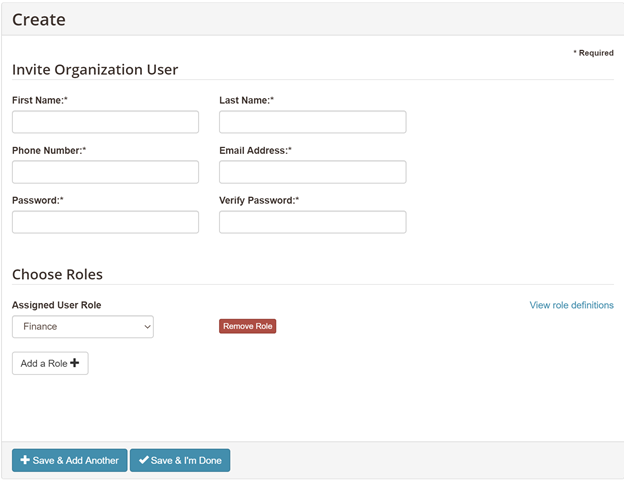
Complete the Invite Organization User section with the user's first and last name, phone number, email address, and a password. Please Note: They will be asked to reset their password.
-
In the Choose Roles section, select the role from the Assigned User Role drop-down. Use the Add a Role + button to add additional roles your user may need. A list of the role permissions can be found further down in this article.
-
Once finished, click the Save & I'm Done button.

-
Before the new user confirms their account, you can find them listed on the Pending page

-
Once the user confirms their registration, you can see them listed on the Find page

Finance
Sees all functionality of our application except Administration.
Fundraising
View and add profiles. View gift data. Cannot see financial data.
Volunteer Coordinator
View and add profiles. Accept volunteers. Cannot see financial data.
Relationship Manager
View donor and gift data. Can see financial data.
Data Entry
Add and search profiles, gifts, and batches. Import historical data. Cannot view historical financial data.
Organization Administrator
Manage users, integration options, and single sign-on.
Communications
Manage photos, widget code, and websites. Cannot see financial data.
Shipping
View profiles. Create picklists. Cannot see financial data.
Analytics Designer
Design analytics and dashboards created by Vision2 or the organization.
Analytics Viewer
View analytics and dashboards created by Vision2 or the organization.
Profile Credentials Manager
Update and reset credentials for an individual.
